Canalblog
Suivre ce blog Administration + Créer mon blog

Jo.oS

3 février 2012

Vint's Primskirt Builder - Build a skirt


1. Rez the Vint


2. Click on it, a menu opens. It tells you how many prims it will rez (12 by default). The MORE button adds 2 prims, the LESS button removes 2 prims. Choose how many prims you want for your skirt (from 2 to 30) and click REZ.

Three things appear : on the left, the basic piece of skirt (actually the one we built in the previous tutorial), in the middle, above the posestand, the skirt you'll get at the end if you follow well this tutorial, and on the right a flat cube used to set the waist size. you will NEVER touch the skirt itself. Any modification is made on the left and right prims.


3. Edit your basic piece of skirt, on the left. Give it size, parameters, flexi, texture you want. What you change on this piece is changed on every pieces of the skirt. See the evolution on the skirt, though let the Vint time to do the changes, don't go too fast.

You can sit on the posestand and adjust the skirt directly on your avatar. Lift the piece to lift the whole skirt. (Moving this piece on any axis will move the whole skirt on the same axis).

Note : clicking on the posestand calls the menu. You can click on IGNORE to close it.

If you want to start again from the beginning, click WIPE.

During your work, if you think your skirt misses prim, don't panic. Click the posestand ->MORE then REZ (if you think it has too many, choose LESS). The Vint will re-rez the whole skirt with the changes you've already made. Again, give it time before continuing your changes.


4. Set the waist size in changing the Y and Z sizes of the white cube on the right. If you change its X, it will offset the pieces in height.


5. Once you're happy with your skirt, click on the posestand -> LINK then confirm. The Vint tells its progression in the local chat, and ask you to be patient :) When the skirt is ready, it is offset. You can now rename it, take it and wear it.


Trick : If you want to start again from the same skirt, click the posestand -> REZ. Wait until the Vint rezzes the skirt again and applies the changes previously made. After the skirt appeared completely, you can do the changes you want (still on the left and right prims) and / or click the posestand-> LINK. If you have not moved the previous skirt, the new will be placed in the same place. This is useful for multi-layered skirts. There is however, sometimes, a small catch ... Vint can bug and not rez exactly the same skirt. : s


Publicité
Publicité
3 février 2012

Vint's Primskirt Builder - Construction d'une jupe


Markeplace


1. Rezzez le Vint


2. Clic gauche dessus, un menu s'ouvre. Le bouton MORE ajoute 2 prims, le bouton LESS en retire 2. Le bouton REZ rezze les prims. Choisissez le nombre de pans qu'aura votre jupe (de 2 à 30) et cliquez sur REZ pour la générer.

Le Vint rezze 3 choses : à gauche, le pan de base de la jupe, au milieu la jupe au dessus du posestand, à droite un cube pour regler le tour de taille. NE TOUCHER JAMAIS à la jupe au milieu. Toutes les modifications se font sur les prims à gauche et à droite du posestand.


3. Editez votre pan de base, à gauche. Donner lui la taille, les paramètres, la flexibilité, la texture que vous voulez. Ce que vous appliquez à ce pan est appliqué à tous les pans de la jupe. Observez l'évolution sur la jupe, mais laissez le temps au Vint d'effectuer les changements, n'allez pas trop vite.

Vous pouvez vous tenir sur le posestand et voir comment la jupe rendra une fois portée. Remontez la jupe sur vos hanches en remontant le pan à gauche.(Déplacer le pan sur n'importe quel axe déplace la jupe entière sur le(s) même(s) axe(s) )

Note : cliquer sur le posestand appelle le menu. Vous pouvez cliquez sur IGNORE pour le fermer

Si vous voulez recommencer du début, cliquez sur WIPE.

En cours de travail, vous trouvez que votre jupe manque de prim ? Cliquez sur le posestand -> MORE puis REZ (si vous trouvez qu'il y en a trop, choisissez LESS).. Le Vint va re-rezzer tous les pans, avec les modifications effectuées auparavant. Laissez-lui le temps avant de continuer vos modifications.


4. Réglez le tour de taille en changeant les dimensions Y et Z du cube blanc à droite. Si vous changez son X, les pans se décalent en hauteur.


5. Une fois que vous êtes content de votre jupe, cliquez sur le posestand : le menu apparait. Cliquez sur LINK puis confirmez. Dans le chat local, le Vint vous dit qu'il lie les pans, montre la progression et vous demande de patienter.

Quand tout est lié, la jupe est déplacée à l'extérieur. Vous pouvez alors la renommer, la prendre et la porter.


Astuce : Si vous voulez repartir de la même jupe, cliquez sur le posestand -> REZ. Attendez que le Vint rez à nouveau les pans et refasse les modifications. Une fois vote jupe complètement apparue, faites les modifications que vous voulez (toujours sur les prims de gauche et de droite) et/ou cliquez sur le posestand-> LINK. Si vous n'avez pas bougé la précédente jupe, la nouvelle ira se placer au même endroit. Ceci est utile pour les jupes multicouches. Il y a cependant un petit hic... il arrive au Vint de bugger et de ne pas rezzer exactement la meme jupe qu'au départ. :s


3 février 2012

Vint's Primskirt Builder - Faites-le vôtre (fr)


Le Vint's Primskirt Builder est un outil qui vous permet de répéter circulairement un même objet. Principalement utilisé pour construire des jupes, vous pouvez aussi changer la forme du prim de base en sphère et fabriquer des bijoux. Cependant, le nombre de prims est limité, si vous avez plus de 30 prims, utilisez le Looprez.


Où le trouver :

inworld

marketplace


Tuto en vidéo


1. Rezzez le Vint, faites glisser le "prim" depuis l'onglet CONTENU sur le sol
2. Clic droit sur ce prim -> OUVRIR -> copier vers l'inventaire pour récupérer le script
3. Rezzez un cylindre, donnez-lui la taille, les paramètres et la texture que vous voulez
4. Renommez-le "prim" (sans les guillemets)
5. Mettez dans son CONTENU le script que vous avez récupéré plus tôt
6. Clic droit -> PRENDRE
7. Retour au Vint. Éditez-le, supprimez le "prim" de son contenu. Ajoutez le vôtre.
8. Renommez votre Vint.
9. Clic droit -> PRENDRE pour sauvegarder


Félicitations ! Vous avez maintenant un outil qui rezzera des jupes à votre nom.


3 février 2012

Vint's Primskirt Builder - Make it yours (en)

The Vint's Primskirt Builder is a tool used to repeat an object in a circular shape. Mostly used to build skirt, you can also change the prim shape to a sphere and create jewelery (number of prims is limited tho, if you wanna use more than 30 prims, use the Looprez)


Get it:

inworld

marketplace


1. Rez the Vint, from its content tab, grab the "prim" onto the ground.
2. Open the "prim", copy the script to your inventory
3. Rez a cylinder, give it size, parameters and texture you want
4. Put in its content tab the script you got from the "prim"
5. Rename your cylinder "prim" (without quotes)
6. Take it in your inventory
7. Back to the Vint, delete the "prim" it has in its content tab. Put yours instead.
8. Rename your Vint
9. Take it in your inventory to save it.


Congratulations ! You now have a tool that will rez stuff with you as the creator !


2 février 2012

The Anchor System - Le Système d'ancrage


The anchor system allows you to move a linkset of prims (anchored prims) in just moving one prim (the anchor prim).

It also allows you to add prims to an already animated object without having to re-animated them. but we'll see that later


For that :

1. Give each anchor prim of the linkset a unique NAME.

2. In the DESCRIPTION field of each anchored prim, write "anchor to [name of the prim you want this prim be anchored to]" without quotes

3. That's all. Move the main prim/the anchor prim of the linkset, all the anchored prims follow.


Le système d'ancrage vous permet de bouger un ensemble de prims (les prims ancrés) en ne bougeant que l'un d'entre eux (le prim d'ancrage).

Cela vous permettra aussi d'ajouter des prims à un objet déjà animé sans avoir à ré-animer ces nouveaux prims.


Pour ça :

1. Donnez à chaque prim d'ancrage un NOM unique

2. Dans le champs DESCRIPTION de chaque prim ancré, mettez "anchor to [nom du prim auquel vous voulez que ce prim s'ancre]" sans les guillemets.

3. C'est tout. Bougez le prim principal/ le prim d'ancrage, tous les prims ancrés à ce prim suivent.


Publicité
Publicité
1 février 2012

Puppeteer - Tutorial (english)


What you need :

- An object to animate, which root prim will stay static. Prims are animated relatively to the root prim, so it mustn't move. You could ever hide this prim in making it invisible. (Root prim is the last prim selected before linking).

- Puppeteer scripts (marketplace , shop in world (check his tutorials too))

- a low lag sim

- some patience


BASIC SETUP


1. Rez the object you want to animate.

2. Drag the 3 Puppeteer scripts from your inventory into the CONTENT tab of your object.

A pop up opens :

tuto pupp_001


3. Right clic on your object and TAKE


4. Re-rez this object. (It is automatically renamed with "Re-rez to Setup Puppeteer")


5 .Rezzing this object again makes a pop up open, asking you to activate scripts in selection.

Edit your object and go at the top of your screen BUILD -> Scripts ->Set scripts to running

set script en


When scripts are running, your object tells you in the local chat "Puppeteer link activated. Removing Puppeteer link from root prim." then "type '/32 menu' to bring up the editor menu." Your object is now ready to be animated \o/


ANIMATION


-NEVER UNLINK YOUR OBJECT. To move prims, tick "edit linked part", hold down SHIFT key to select several prims.

-An object animated with Puppeteer can't move an avatar sat on it.


For this tutorial, I will animate the left arm of my pin up girl so that she waves her hand like a Beauty Miss.

1. Call the edit menu in typing /32 menu in the local chat.

pupp_001


 I like the position of my pin up girl, I click on RECORD. I juste saved my first snapshot.


2. I lift the arm up, position well the prims, click on RECORD. 2nd snapshot saved.

pupp_002


3. I come back to the previous snapshot clicking on SHOW PREV, then I click on RECORD. 3rd snapshot saved.


4. I move the arm down, click on RECORD. 4th and last snapshot saved.

pupp_004


SETTINGS


-TRIGGER

Triggers are what control the animation playback. 

1. Click on TRIGGER. You get a summary of the default trigger settings.

pupp_010


2. Click on EDIT, you get a list of availaible ways to  trigger your animation. I choose ON-TOUCH, my object will be animated when it will be clicked.

pupp_005


3. Then, the playback style. I choose LOOP.

pupp_006


4. Choose the order in which the snapshots will be played (low to high, high to low, random, custom). I choose low-to-high.


5. Optional settings :  You can set the delay between 2 snapshots (EDIT DELAY), make your animation smoother (but slower) (AUTO-SMOOTH) choose that only the owner could trigger the animation (OWNER ONLY). Change what you want then click on NEXT.


pupp_008


6.Back to the TRIGGER menu, with a summary of your settings :

pupp_010

Check. If you're happy with it, click on RETURN and go to step 7, otherwise click on EDIT and start again at step 1. (yes, my picture is wrong, playbackstyle is supposed to be LOOP)


7. Back to the main menu. Click on PUBLISH then YES, PUBLISH ! Your object tells you he's ready and how to trigger its animation in the local chat. Trigger it and enjoy your work !


SUMMARY


1. Your virgin object on the ground, drag the 3 scripts inside its CONTENT tab.

2. Take it back in your inventory

3. Rez it again

4. Edit it and go to BUILD->SCRIPTS->SET SCRIPT TO RUNNING. Wait for it's done

5. Start animating, move your prims, click on RECORD to save snapshots.

6. Set the trigger.

7. PUBLISH then YES PUBLISH !


Make your animation easier with the Anchor system


31 janvier 2012

Puppeteer - Tutoriel (français)


Ce qu'il vous faut :

- un objet à animer, dont le root prim sera statique. Les prims sont animés relativement au root prim, il ne doit donc pas bouger. Vous pourrez toujours cacher ce prim en le rendant invisible. (Le root prim est le dernier prim selectionné avant de lier).

- les scripts du Puppeteer ( marketplace shop inworld )

- une sim à lag bas

- de la patience


PREPARATION


1. Rezzez l'objet à animer

2. Mettre les 3 scripts dans l'onglet CONTENU du root prim

Une pop up s'ouvre :

tuto pupp_001


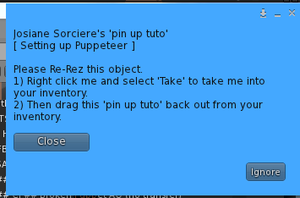
3. Clic droit sur l'objet et selectionnez PRENDRE


4. Re-rezzez cet objet. (Il est automatiquement renommé avec "Re-rez to Setup Puppeteer")


5 .En re-rezant l'objet, une nouvelle pop up s'ouvre pour vous demander d'activer les scripts dans la sélection.

Editez votre objet et en haut de l'écran Construire -> Scripts -> Définir les scripts sur exécution

set script


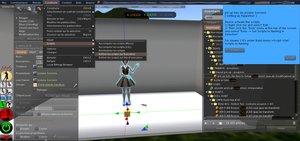
Lorsque tous les scripts sont activés, votre objet vous dit dans le chat "Puppeteer link activated. Removing Puppeteer link from root prim." puis "type '/32 menu' to bring up the editor menu." Votre objet est prêt à être animé \o/


ANIMATION


-NE JAMAIS DELIER SON OBJET. Pour bouger les prims, cochez la case "modification liée", appuyer sur shift en cliquant sur les prims pour les ajouter à la sélection.

-Le Puppeteer ne permet pas de bouger un avatar qui s'assied sur un prim animé.


Pour ce tuto, je vais animer le bras gauche de ma pin up afin qu'elle fasse un "coucou" façon Miss France.

1. Appelez le menu d'édition en tapant /32 menu dans le chat local

pupp_001

-HELP : vous donne une liste des commandes disponibles via le chat local.

-RECORD : enregistre un snapshot ; enregistre les position, taille et rotation de chaque prim.

-PLAY : rejoue les snapshots enregistrés.

-PUBLISH : pour publier l'animation, bouton final.

-SHOW PREV : montre le snapshot précédent.

-TRIGGER : pour choisir comment déclencher l'animation et comment les snapshots seront joués.

-SHOW NEXT : montre le snapshot suivant.


J'aime la position de base de ma pin up, je clique sur RECORD. Je viens d'enregistrer mon premier snapshot.


2. Je bouge mon bras vers le haut, je positionne bien mes prims, je clique sur RECORD. 2e snapshot enregistré.

pupp_002


3. Je reviens au snapshot 1 en cliquant sur  SHOW PREV et je clique sur RECORD. 3e snapshot enregistré.


4. J'amène le bras de la pin up en bas, je clique sur RECORD. 4e et dernier snapshot enregistré.


pupp_004


Astuce : Pour faciliter vos déplacements de prims, selectionnez en dernier le prim le plus proche du centre de rotation/le prim le plus proche de l'arrivée. Il deviendra alors le "root prim" de tous les prims selectionnés. Sur mes photos, on peut voir que pour  le snapshot 2, mon "root prim" était la main. Du coup, lorsque j'ai tourné l'ensemble des prims sélectionnés, ils ont tournés par rapport à la main. Pour le snapshot 4, j'ai pris l'avant-bras, le centre du prim est plus proche du haut du bras, c'est plus facile pour déplacer/tourner.


REGLAGES


-DECLENCHEURS

Le bouton TRIGGER vous sert à définir ce qui va déclencher l'animation.

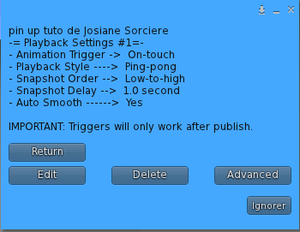
1. Cliquer sur TRIGGER. Le menu des déclencheurs apparaît, avec le récapitulatif du déclencheur par défaut :

pupp_010


2.Cliquez sur EDIT, on a une liste de tous les déclencheurs possibles. Je choisis ON-TOUCH, mon objet s'animera quand on cliquera dessus.

pupp_005

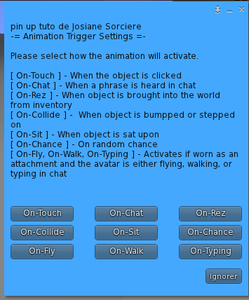
-ON TOUCH : l'animation est déclenchée quand on clique sur l'objet

-ON CHAT : quand on dit quelque chose dans le chat. Il est conseillé de ne pas choisir le chat local pour éviter le lag (l'objet écoutera constament le chat pour entendre son déclencheur).

-ON REZ : quand l'objet est rezzé au sol ou sur l'avatar

-ON COLLIDE : quand on fonce dans l'objet ou qu'on marche dessus

-ON SIT : quand un avatar s'assied sur l'objet

-ON CHANCE : l'animation est déclencher au hasard. Vous pourrez ensuite choisisr la fréquence et le pourcentage de chance que cette anim se déclenche.

-ON FLY/ON WALK/ON TYPING : l'anim se déclenche quand l'avatar vole/marche/écrit.


3. Viennent ensuite les différents styles de lecture de l'animation. Je choisis LOOP, mon animation sera jouée en boucle.

pupp_006

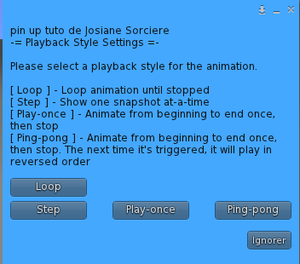
 -LOOP : joue l'animation en boucle

-STEP : joue les snapshots un par un, à chaque fois qu'on utilise le déclencheur.

-PLAY-ONCE : joue l'anim du début à la fin et s'arrête.

-PING-PONG : joue l'anim du début à la fin et s'arrête. La prochaine fois qu'on usera du déclencheur, l'animation sera jouée en sens inverse.


4. Choisir l'ordre dans lequel les snapshots seront lus.

-low to high = croissant

-high to low = décroissant

-random = aléatoire

-custom = personnalisé

Je choisis low-to-high.


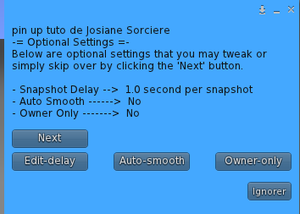
5. Reglages optionnels :  Vous pouvez choisir le délai entre deux snapshots (EDIT DELAY), adoucir votre animation (AUTO-SMOOTH) et réserver le déclenchement de l'animation au propriétaire seulement (OWNER ONLY). Changez ce que vous voulez, puis cliquez sur NEXT.


pupp_008


6. Retour au menu du TRIGGER, avec un récapitulatif de vos choix :

pupp_010

Vérifiez. Si vous êtes contents, cliquez sur RETURN et passez à l'étape 7, sinon cliquez sur EDIT et recommencer à l'étape 1. (oui, mon image est fausse, le playback style est censé être LOOP)


7. Retour au menu principal. Cliquer sur PUBLISH, puis YES, PUBLISH ! Un tourbillon d'étoiles entoure votre objet, il vous dit qu'il est prêt et comment déclencher son animation dans le chat. Déclenchez-le donc et admirez votre oeuvre !


RESUME


1. L'objet vierge au sol, faire glisser les 3 scripts dans l'onglet contenu

2. Prendre l'objet dans son inventaire

3. Rezzer à nouveau cet objet scripté

4. En l'éditant -> Construire -> Scripts -> Définir les scripts sur exécution. Attendre la confirmation dans le chat local.

5. Commencer l'animation, bouger les prims, enregistrer les snapshots en cliquant sur RECORD.

6. Régler le déclencheur et le style de lecture (TRIGGER)

7. PUBLISH puis YES PUBLISH !


Simplifiez-vous l'animation avec le Système d'ancrage


Publicité
Publicité
Jo.oS
Publicité
Publicité